AI system controller with Raspberry Pi, M-HAT, and Particle Ledger

Ready to build your IoT product?
Create your Particle account and get access to:
- Discounted IoT devices
- Device management console
- Developer guides and resources
Background
With the current state of large language models (LLMs), it’s more reliable than ever to control your devices through voice commands. In this project, let’s explore how to configure a system that you can operate with your voice. We’ll use a Raspberry Pi and Particle’s device Ledger to sync the system’s state over LTE.
Overview
Imagine a greenhouse controller that manages various environmental factors, including internal temperature, grow light intensity, fan speed, and window openings.
While working in the greenhouse, you will want to update the system hands-free. When at home with access to a computer, you’ll want to monitor the current state of the system.
To achieve this, we’ll deploy an LLM running locally on a Raspberry Pi that can translate voice commands such as “it’s too cold in here” to an updated device state. Then, we’ll use Particle’s Device Ledger to sync the updated device state to the cloud over LTE so that the system can work without Wi-Fi access.
Let’s consider the system state with the following structure. The values can range from 0% to 100%.
{ "temperature": 30, "fan": 0, "lights": 20, "window": 0 }
We’ll have a Python application running on the Raspberry Pi that will translate the voice command into text. The text along with an instruction prompt gets sent to the the local LLM to get the updated state. Finally, the updated state gets sent to a connected Particle module to be transmitted to the cloud.

Raspberry Pi application
The Raspberry Pi application records the voice command and transcribes the command into text. The text is then sent to the local LLM to interpret the intent and return an updated JSON state.
For example, if the LLM is given “it’s too cold in here,” we should expect the updated state to have a higher temperature than before.
The updated state can then be written out to the connected Particle SoM via the M-HAT to be transmitted to the cloud using LTE.
The first step is to transcribe the audio. We’re using a wrapper on the Whisper model from OpenAI for this.
from faster_whisper import WhisperModel

def transcribe_audio():
    # Run on GPU with FP16
    model = WhisperModel(model_size, device="cpu", compute_type="int8")
    segments, _ = model.transcribe(test_file, beam_size=5)
    segments = list(segments)

    for segment in segments:
        print("Transcription: '%s'" % segment.text)

    return segments[0]
In this demo, a locally stored .mp4 file is used to test the system. It is a recording of someone saying: “it’s too cold in here.”
The transcribed text is then passed into the LLM, Gemma 2 2b in this case. We’ll use Ollama and its Python wrapper to run the LLM locally.
def format_prompt(segment):
    prompt = f"""Update the state based on the given text. Return the new state in JSON format.
    Always include a complete state, even if the key does not require an update. The values represent 0 to 100 percent.
    A request to change a value should be followed by the new value.
    The keys are:
    - lights
    - window
    - temperature
    - fan

    The current state:
    {current_state}

    Text: "{segment.text}"
    """

    return prompt

prompt = format_prompt(audio_segment)

response: ChatResponse = chat(
    model="gemma2:2b",
    messages=[
        {
            "role": "user",
            "content": prompt,
        },
    ],
)
Then, we attempt to parse JSON out from the response. Note that the LLM will typically return the new state wrapped in a markdown block, so we look for that ignoring any explanations it might give.
def parse_response(response):
    global current_state

    try:
        response_str = response["message"]["content"]
        json_str = response_str.split("```json")[1].split("```")[0]
        json_str = json_str.replace("'", '"')

        new_state = json.loads(json_str)
        print(f"Current state: {current_state}")
        print(f"New state: {new_state}")
        current_state = new_state
    except:
        print("Could not parse JSON from response")

    return json.dumps(current_state)
Finally, pass the updated state as a string to the serial port:
def write_to_serial(json_str):
    try:
        ser = serial.Serial(serial_port, 115200)
        ser.write(json_str.encode())
        ser.close()
        print("Wrote new state!")
    except serial.SerialException as e:
        print(f"Could not write to serial port: {e}")
You can see how the code comes together in app.py of the particle-structured-llm-app repository. The app can be ran with docker-compose up --build. But, it will require Docker and Docker Compose to be installed on the Raspberry Pi beforehand.
Particle firmware
The firmware component is straightforward. It simply receives the JSON string via the serial connection and parses out the various components. Then, they are formatted and sent to the Particle Ledger to reflect the updated state.
In setup, we initialize the serial port and configure the statusLedger (we’ll set the Ledger up in the next step):
void setup()
{
  Serial1.begin(115200);
  statusLedger = Particle.ledger("b5som-d2c");
}
Next, in the event loop, we can wait for an incoming serial request and attempt to parse out the JSON:
while (Serial1.available())
{
  // {"lights": 50, "window": 20, "temperature": 30, "fan": 0}
  String incoming = Serial1.readString();
  Log.info("Received: %s", incoming.c_str());
  JSONValue json = JSONValue::parseCopy(incoming.c_str());
  if (json.isValid())
  {
    ...
  }
}
If the JSON is valid, we iterate through each key updating a global data Variant as we go. Then, we set a flag indicating that new data was received.
JSONValue json = JSONValue::parseCopy(incoming.c_str());
if (json.isValid())
{
  JSONObjectIterator iter(json);
  while (iter.next())
  {
    if (iter.name() == "temperature")
    {
      Log.info("Temperature: %s", (const char *)iter.value().toString());
      data.set("temperature", iter.value().toDouble());
    }
    else if (iter.name() == "lights")
    {
      Log.info("Lights: %s", (const char *)iter.value().toString());
      data.set("lights", iter.value().toDouble());
    }
    else if (iter.name() == "window")
    {
      Log.info("Window: %s", (const char *)iter.value().toString());
      data.set("window", (const char *)iter.value().toString());
    }
    else if (iter.name() == "fan")
    {
      Log.info("Fan: %s", (const char *)iter.value().toString());
      data.set("fan", (const char *)iter.value().toString());
    }
  }
  newData = true;
}
Once that flag is true and all of the newest data has been extracted, we update the statusLedger with the new state and reset the flag.
if (newData)
{
  statusLedger.set(data, particle::Ledger::MERGE);
  Log.info("Updating Ledger: %s", data.toJSON().c_str());
  newData = false;
}
You can read more about the firmware component of this project in the particle-structured-llm-firmware repository.
Particle Cloud setup
The status Ledger will need to be created in the Particle Console so that our future application will be able to fetch the latest system state.
Start by navigating to the Cloud Services > Ledger page and select “+ Create new Ledger.” Choose “Device to Cloud Ledger.”
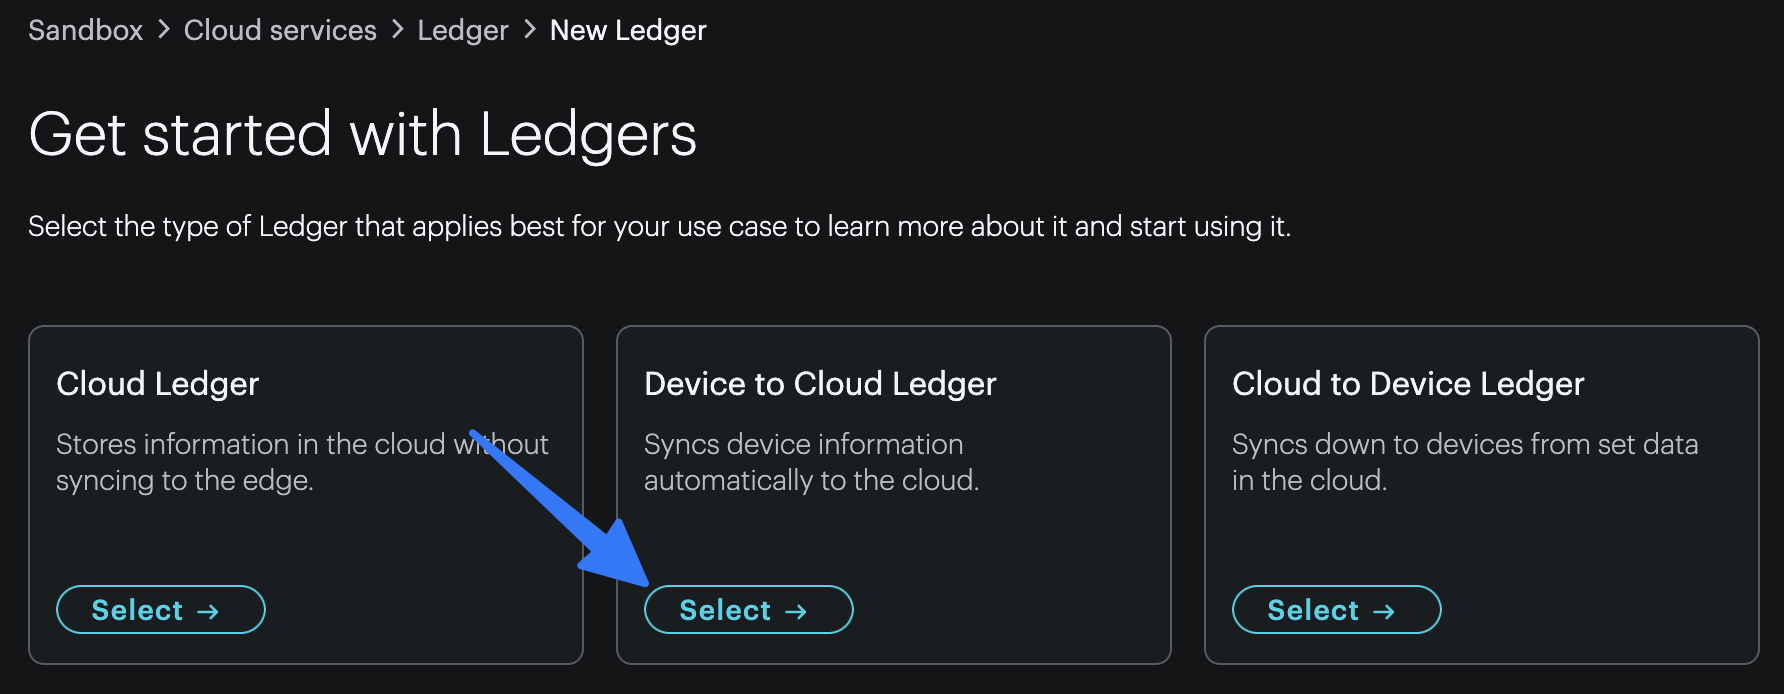
Name it anything you’d like, however, it must match the string passed to this line: Particle.ledger("b5som-d2c"); in your firmware.
Accessing the system state
Now, from the hypothetical web application where you’d like to display the current state of your greenhouse, you can make a request to the Particle Cloud API to get the Ledger instance.
First, we need to list all Ledger instances. Replace :ledgerName with your Ledger’s name and :accessToken with a pre-generated user access token.
curl "https://api.particle.io/v1/ledgers/:ledgerName/instances" \
       -H "Authorization: Bearer :access_token"
You’ll receive a result similar to the following:
{
    "instances": [
        {
            "version": "SOME_VERSION_ID",
            "name": "LEDGER_NAME",
            "scope": {
                "type": "Device",
                "value": "SOME_SCOPE_ID",
                "name": "SOME_DEVICE_NAME"
            },
            "size_bytes": 70,
            "created_at": "2025-03-13T19:00:17.436Z",
            "updated_at": "2025-03-13T19:00:17.436Z"
        }
    ],
    "meta": {
        "page": 1,
        "per_page": 100,
        "total_pages": 1,
        "total": 1
    }
}
Take note of the instance version, and scope ID. We’ll need that for the next request which gets the contents of the Ledger instance.
In this get instance request, replace :ledgerName with your Ledger name, and the :scopeValue with the contents of the instance’s scope.value from the previous requests’s response.
curl "https://api.particle.io/v1/ledgers/:ledgerName/instances/:scopeValue" \
       -H "Authorization: Bearer :access_token"
This should return the latest state from your device, similar to the following:
{
    "instance": {
        "version": "SOME_VERSION_ID",
        "name": "SOME_LEDGER_NAME",
        "scope": {
            "type": "Device",
            "value": "SOME_SCOPE_ID",
            "name": "SOME_DEVICE_NAME"
        },
        "size_bytes": 70,
        "data": {
            "fan": "0",
            "lights": 50,
            "status": "ok",
            "temperature": 60,
            "window": "20"
        },
        "created_at": "2025-03-13T19:00:17.436Z",
        "updated_at": "2025-03-13T19:00:17.436Z"
    }
}
Testing end-to-end
Finally, with everything configured, we can test the end to end system. Make sure the M-HAT is connected to the Raspberry Pi with the SoM is properly installed and programmed.
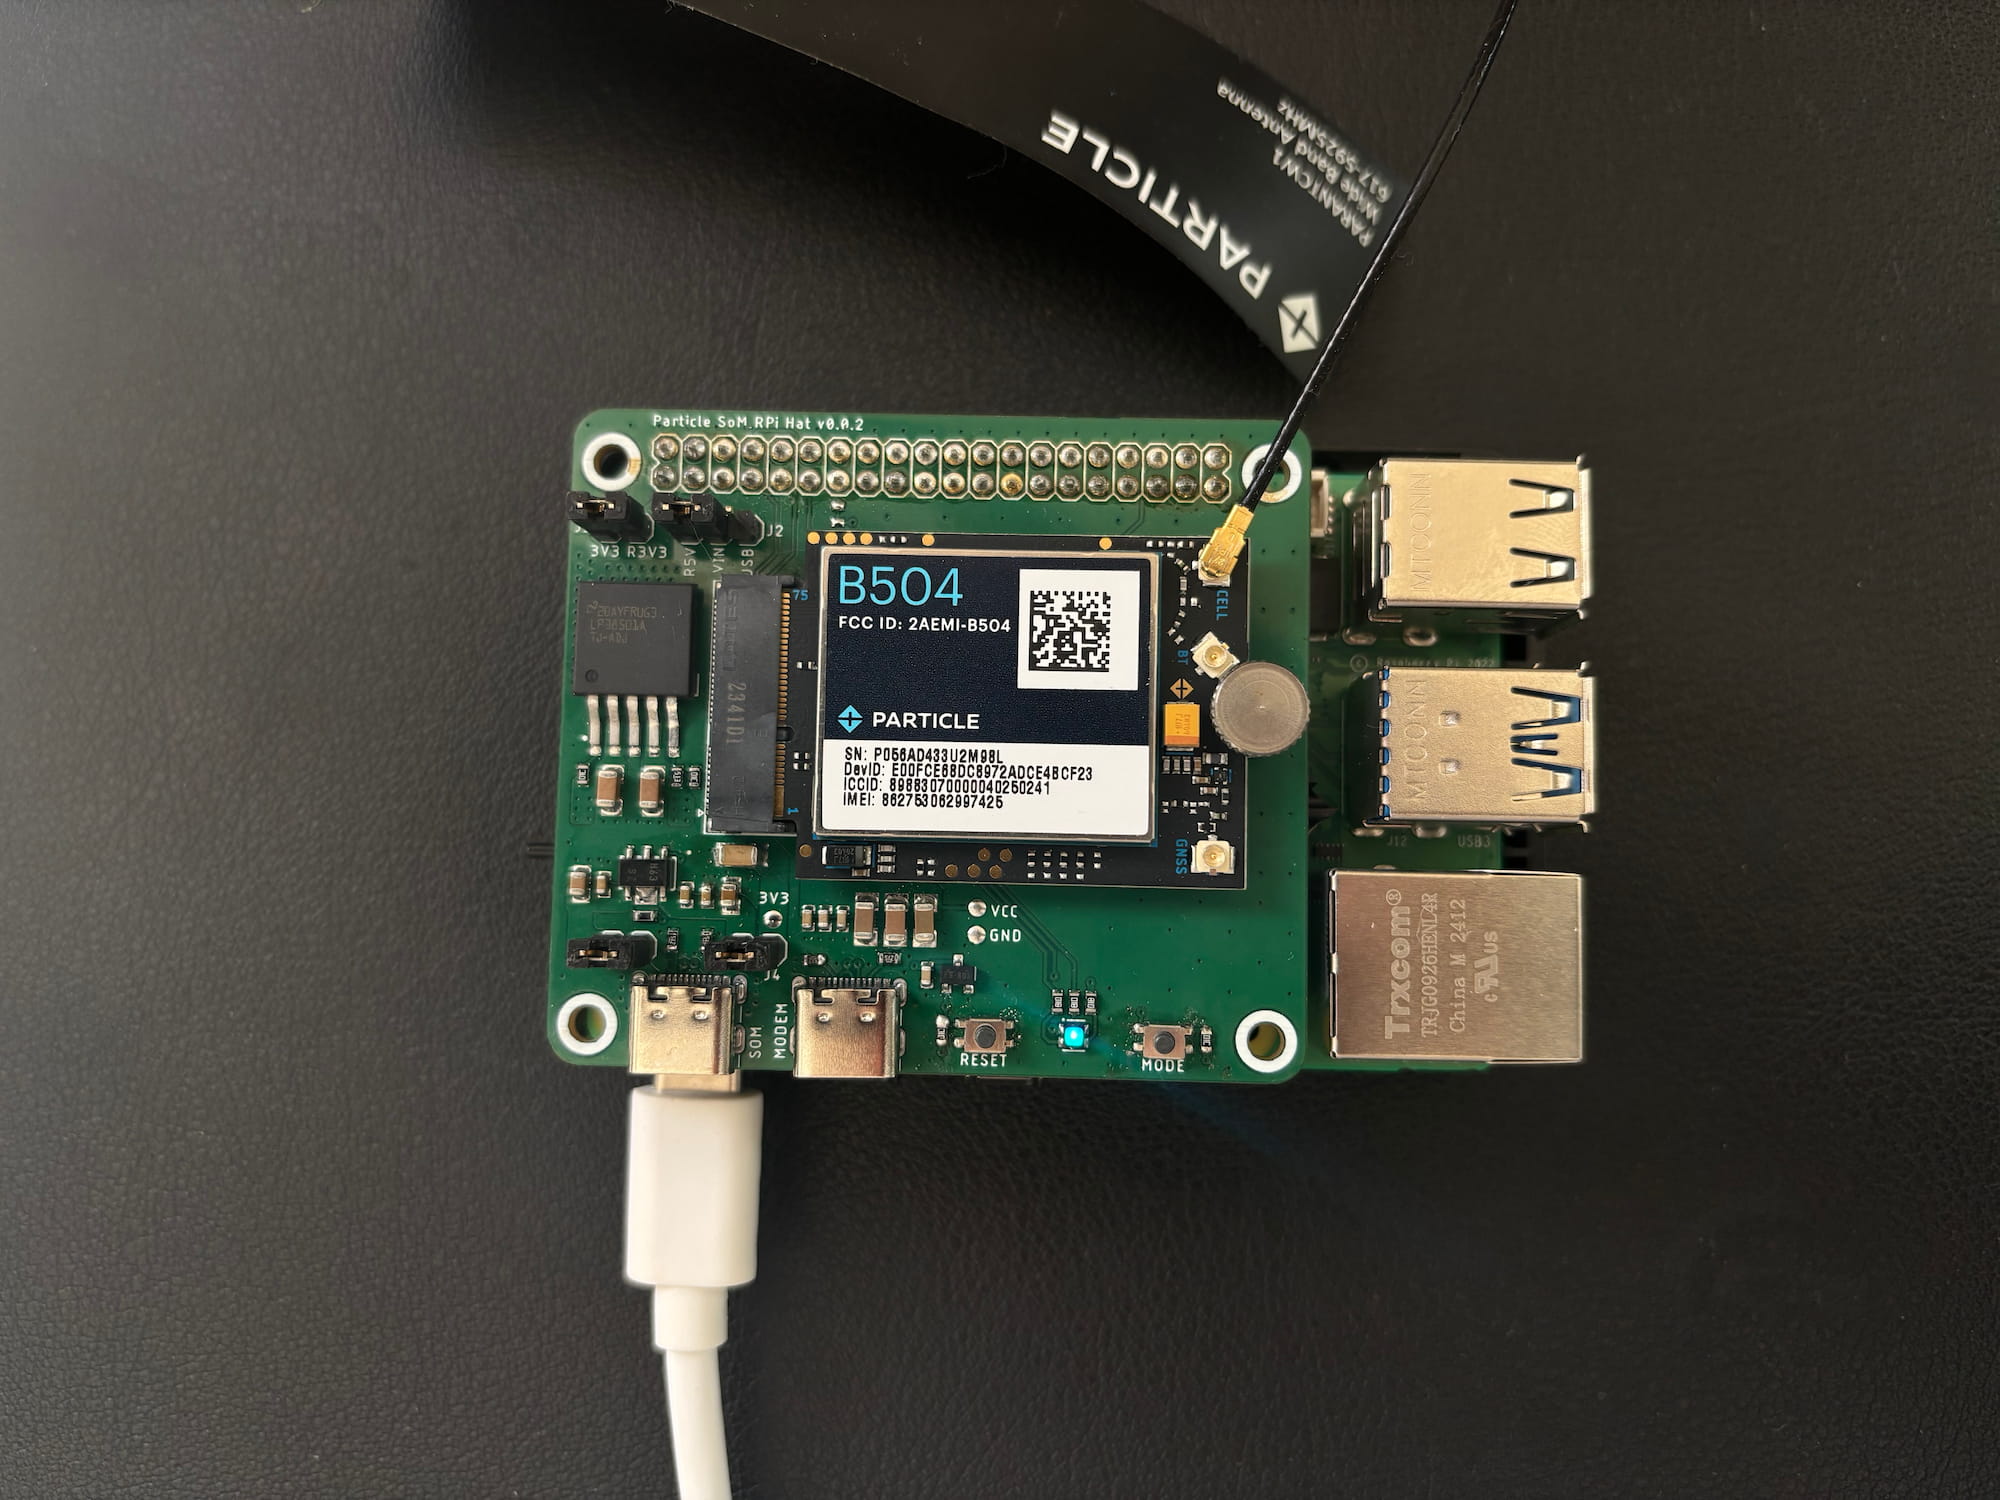
Then run docker-compose up on the Raspberry Pi. It should log out information about the previous state as well as the updated state based on the sample voice recording.
Hopefully the LLM was able to understand that “it’s too cold in here” from the sample recording, which means that the temperature property should increase.
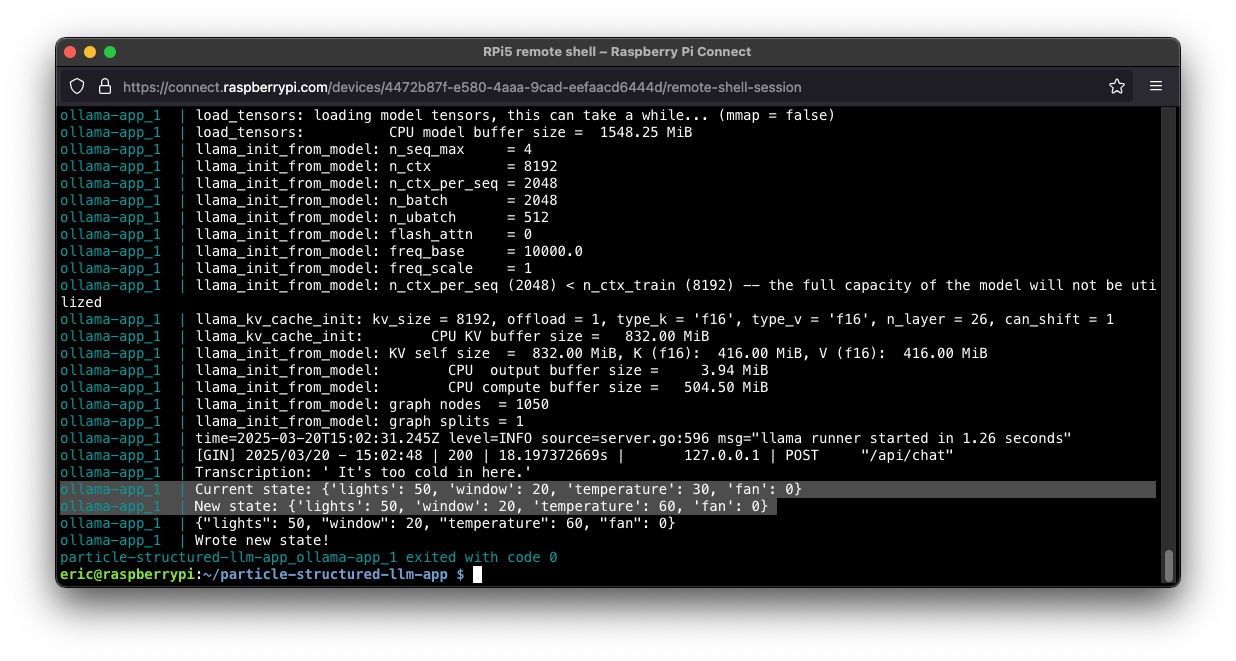
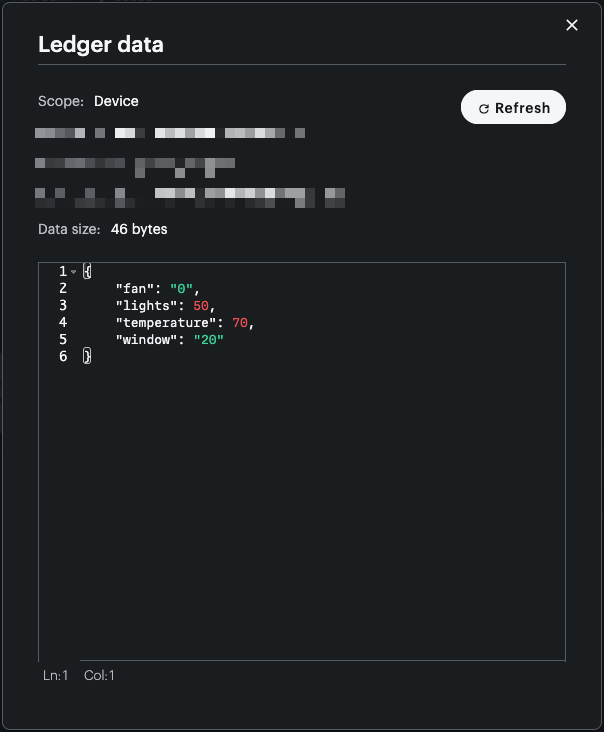
Now you can make a network request to view the Ledger instance:
curl "https://api.particle.io/v1/ledgers/:ledgerName/instances/:scopeValue" \
       -H "Authorization: Bearer :access_token"
Or view the newly updated instance via the Particle Console.
center
Conclusion
This project is just the start of what could be a really useful (hands-free!) system controller. The next step might be to replace the sample recording with a microphone. The LLM application could then be extended to trigger from a wake word, filtering out unnecessary background conversation.
Ready to get started?
Order your M-HAT from the store.
